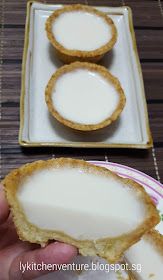
Here's my other attempt on Soya Tarts using store-bought packet soya milk and gelatine powder. My previous attempt uses store-bought packet soya milk and instant jelly powder.
If we have to make a choice, my family would prefer the soya tarts made using instant jelly powder. But I think this is still a great treat in this hot weather when it is served chilled!
Chilled Soya Tarts (packet soya and gelatine powder)
makes 7 Ingredients:
For the Tart Pastry (recipe adapted from Ms Tam Chiak)
150g plain flour
1 tbspn (12g) custard powder
1 tbspn (12g) milk powder
10g sugar
100g unsalted butter, cut into small cubes
1/2 egg, lightly beaten
For the Soya Filling
250ml soya milk (I used Vitasoy)
1 1/2 tsp gelatine powder
Method:
For the Tart Pastry
1. Combine flour, sugar, custard powder and milk powder together and give it a good mix.
2. Rub in the cold butter. (I used a k-beater to mix)
3. Add beaten egg and mix to form a soft dough.
4.
Wrap dough with cling wrap and chill overnight before use. (I placed in
plastic bag and roll out to 5mm thick before putting into the fridge to
chill overnight)
5.
When ready to use, roll pastry dough about 5mm thickness and use a
round cutter to cut out a round shape. Place the cut round dough into
the tart mould. Trim off excess dough around the edges.
6. Bake in preheated oven at 180C for 20 minutes.
7. Remove from oven and let cool before unmoulding.
8. Keep it the fridge before ready to use.
For the Soya Filling
1. Spoon some soya milk into a bowl and sprinkle gelatine powder over the soya milk. Let it sit undisturbed for about 5-8 minutes for the gelatine powder to bloom.
2. In a pot, heat the rest of the soya milk over low heat until you see some bubbles. Do not boil.
3. Stir in instant jelly powder till fully dissolved.
Assembly
1. Pour the soya mixture into the prepared tart pastry till 90% full.
2. Allow to cool before chilling overnight in the fridge to set.
3. Enjoy!
Thanks for dropping by. Do link back to LY's Kitchen Ventures if you have used any information published in this blog.


No comments:
Post a Comment