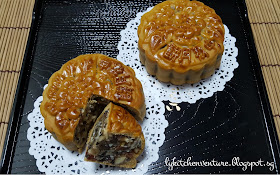
After the successful attempt to make my own Homemade Five Kernel Mooncake Filling (五仁月饼馅), I used them to make my very first batch of Five Kernel Mooncake (五仁月饼).
I'm super elated as I've never in my wildest dreams imagine I'll be able to make these traditional mooncakes myself. Yes, the baking process is not as daunting or difficult as I've imagined and I'm going to 'de-mystify' this with my step-by step picture tutorial!
Five Kernel Mooncake (五仁月饼)
makes 5 big mooncakes (40g dough : 110g filling)
Ingredients:
550g five kernel mooncake filling (refer to recipe here for homemade five kernel mooncake filling)
For the Dough
70g plain flour
70g hong kong flour
(B - mix together)
95g golden syrup (I used 'Tate Lyle')
1/2 tsp alkaline water
For the Egg Wash
1 egg yolk
1 tbspn water or milk
2 drops of oil
2 drops of oil
Miscellaneous
Some water in a sprayer (to spray onto the mooncakes before baking in the oven. This is to prevent the crust from cracking.)
Method:
2. Mix (B) together and pour into the sifted flour mixture.
3. Knead to form a soft dough.
4. Cover with cling wrap and rest the dough for at least 40 minutes.
5. Preheat oven to 200C.
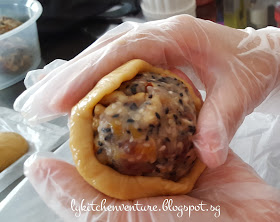
6. Divide dough into required size, shaping each dough into a ball. (I wore a powder free and food grade glove for easy handling)
7. For each dough, flatten to form a small disc. Wrap the dough skin around the filling and shape into a ball.
8. Dust mooncake with plain flour. Press the wrapped dough into the mould. (I did not wear glove for this step. I flour my hands lightly as well.)
10. Spray some water onto the mooncake (this is to prevent cracking) and bake in preheated oven at 200C for 10 minutes.
12. Lightly apply the egg wash onto the mooncake and continue to bake at 200C for another 10 minutes or until golden brown.
13. Remove from oven and immediately brush with super glaze. (This is available from Phoon Huat. It is to give the mooncake the extra shine. I omitted.)
14. Leave the mooncake to cool down.
15. Store in air-tight container with the 'top' facing downwards for 3 days to allow the mooncake to 回油. (Update : I've also made a batch of traditional mooncake but let it 回油 without inverting the mooncake to face downwards and it was ok. So you can do either way and choose not to invert if concerned that the print may be spoilt.)
Thanks for dropping by. Do link back to LY's Kitchen Ventures if you have used any information published in this blog.


Hi d mould to use is for how many grams ?
ReplyDeleteHi Yee Fong, the mould I used can make 150g mooncake.
DeleteTks. Will it affect the print if invert d mooncake top facing downwards ?
ReplyDeleteHi Yee Fong, I've tried both inverting and not inverting. Both ways worked fine for me.
DeleteOK tks for sharing.
Delete